Search This Blog

Wednesday 12 October 2011

Jaffa CupCakes!

More of our Favourite snacks turned into a Cupcake!!!!
Yummy!

Inside.
I did a basic 12 Vanilla Cupcake recipe:
125g Butter
125g Sugar
2 Eggs
125g Self Raising Flour
1 tsp Vanilla Extract.
  • Beat Butter and Sugar together til soft and fluffy, add the 60g of the flour and 1 egg and then add the other 65g of the flour and the remaining egg.
  • Add the tsp of Vanilla and put the mixture in Paper Cases and bake for 11 minutes or until a toothpick inserted comes out clean.
I made a batch of Buttercream to the ratio of usually 1:2 Butter to Icing Sugar (more can be added to your taste.)
I split the batch into two and added 3 tbsp of Cocoa Powder to one and 1 tsp of Orange juice or Orange extract to the other (Orange food colouring is optional)
Put the Orange Buttercream into a piping bag with a Wilton 230 Nozzle and piped some Buttercream into the middle. I added a dollop of Chocolate Buttercream to the top and smoothed it out.
To top off I sliced up some Jaffa Cakes and sprinkled on.

Fondant Animals for a Birthday Cake

Sorry for not updating in a while, I've been baking but not anything worth putting up on here, plus been busy recently in College but I do hope to have some more recipes and pictures up soon
My cousin is turning 5 in January and he wants a Safari cake so I made him some animals for his cake, these are a few so far.
Cheeky Monkey.

Snake.

Zebra.


Sunday 4 September 2011

Fondant Bugs and Ducks!

Fondant Bugs and Ducks!

              I recently got some Sugarflair Paste Food Colours and a Block of White Sugarpaste and I felt the need to mess around with them so I decided to make some more Decorations!

        I started making some Bees as I had previously coloured some White Fondant Yellow and Black so I made these cute little Bees!
        What are the wings? May you ask, well they are Leaves of Gelatine cut into wing shapes and then pushed into the still soft Fondant. However the Gelatine is Pork Gelatine and I'm not sure if there is Vegetarian Gelatine Leaves but I did see this on a Youtube Video or some sort and thought is was such a great idea and it did work out well!!!
         I was on a roll so I made a Dragonfly using balls of Green Fondant and again Wings made out of Gelatine Leave, next I made Snail the body itself was just some Grey Fondant rolled into a ball and shaped but the Shell itself was a random thought, I took three colours of Fondant (in my case it was Yellow, Red and Lilac) and plaited them together and then rolled up creating the effect and it sure does look pretty. Last but not least I made Ladybugs, little rounded retanglesof Red Fondant with a Black head and wing line and however many dots I decided to put on! The Green thing is a Leaf I made by just using a Rose Petal cutter and veining it myself but I crumpled up a piece of Kitchen Paper and rested the Leaf ontop the the Lead fell and rested on the crinkles in the Paper towel giving it a pretty effect.


And last but not least my Ducks.
            My Ducks are going to go on top of a order of Cupcakes I am making for a Fundraiser as they do fit in with the event in more ways then one.


Malteser Cupcakes.

Malteser Cupcakes.

Well I made Malteser Cupcakes in a Cake form for my friends birthday as she Loved it so I decided to make it into Cupcakes, well they sure went down a treat with my mates (either that or they Loved the free Cake?)

This recipe just uses a simple 12 Cupcake Batter but it has both Crushed and Whole Maltesers in adding Honeycomb Pieces/Chocolate Chips would add more flavour and Crunch! Heres the recipe:

125g Butter
123g Sugar
125g Self Raising Flour
2 Eggs
100g Crushed and Whole Maltesers
2 Tsp Vanilla
Any Gram packet of Honeycomb pieces or Chocolate Chips (Optional)

To Decorate a did a simple swirl; with a Wilton 1M nozzle, of Vanilla Buttercream with
125g Butter
350g Icing Sugar
2 Tsp of Vanilla
Decorated by both me and my Little Sister, I say we did a good Job!

A 'Mr Whippy' Swirl with some Chocolate Decs and a Yellow Fondant Star!


Thursday 4 August 2011

Lush Chocolate Tart!

I've been collect Baked and Delicious and I must say it is certainly worth the money (£4.99 an Issue) and its sooo fun to Bake out of it too!
This is a Chocolate Tart I have baked and it's never lasted longer than half a day so thats good.

Dark Chocolate Tart

300g Sweet Shortcrust Pastry
or
250g Plain Flour
125g Butter, softened and cubed
75g Caster Sugar
1 Egg, beaten

Place butter and flour together and rub together using fingertips until Bread Crumbs with a few lumps of butter.
Chill until needed

Filling

1 Egg
1 Egg Yolk
50g Caster Sugar
150g Plain Chocolate (Dark)
25g Butter (I use salted as I think it enhances the richness of the Chocolate)
1 tbsp of Double Cream
1-2 tsp Dark Rum (I never put the rum in as I'm only 15 and I don't fancy having that in but if you want to by all means do.)

Roll out the pastry until 1 cm thick and roll over the Rolling Pin and place into the Pie dish.
Preheat oven to 180C.
Set the Pie dish on a baking sheet and line Pastry shell with Grease-Proof paper or Tin Foil greased on the side which will meet the Pastry shell, fill with Baking Beans, Rice or any dried beans or lentils. Bake for 15 minutes and remove the Paper/Foil and leave to cool.
Melt the Butter, Chocolate, Cream (and Rum) in a bowl either in the Microwave stirring at 30 second intervals or over a pan of simmering water.
While the Chocolate is melting whisk the Egg, Egg Yolk and Sugar until thick, pale and doubled in volume.
Fold the melted Chocolate carefully down the side of the Egg mixture as to not knock the air out.
Pour the mixture into the cooled Pastry Shell and bake for 12 minutes until set.
Leave to cool until decorating with some Chocolate Curls, Icing Sugar and/or some Cocoa Powder.

Best served Chilled as the Chocolate filling melts in the mouth!

Enjoy!!!

Friday 29 July 2011

Happy Birthday Mum!

            Over the past week I have been making the Decorations for my Mums Birthday Cake including Roses, Flowers and of course Nemo.
            Yesterday I banned my Mum from the kitchen while I made her cake, I made a Chocolate Sponge with a Chocolate Buttercream and Raspberry Coulis Filling, Yummy!!! I then Crumb Coated it in Vanilla Buttercream and I must admit it was my second time Crumb-Coating and it was Awesome!! I rolled out the 500g of Red Fondant I had and I must admit I had been looking at charts to see how much Fondant I would need to cover the cake and it said for a 7 Inch Cake you would need 600g and I only had 500g but when I rolled it out and put it on the cake I had LOADS left over so obviously for this Cake you didn't need 600g!
           After the Fondant was on the Cake I went to town on it, my Artistic Skills came through, I piped with Royal Icing the Nottingham Forest Badge with Forest written under it and then added the Fondant Nemo (Which my Mum loved more than the Forest Badge!!) and a Orange Rose to the side with 2 leaves. Around the edge I stuck some Fondant Flowers and leaves with some more Royal Icing and the Cake was starting to come together. The area inbetween the Flowers looked bare so using some chocolate Moons, Stars and Heart I stuck them on with a small dot of Royal Icing and it just looked Ah-mazing! I finished off with a Shell Border along the bottom edge (the cake was sliding a little) and some edible glitter painted along the top added a sense of Femininism to it so.

Sorry it's sideways, I don't know how to rotate!

From the Side.

Voila!

Tuesday 26 July 2011

Fondant Flowers.


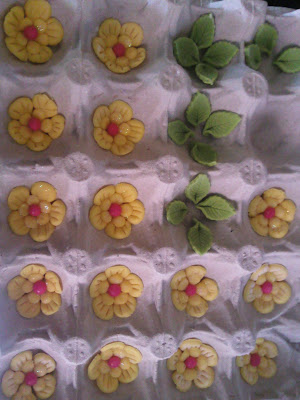
My Mum found the Fondant Flowers I made yesterday for her cake, well I showed her as I was proud. I rolled the Fondant out thinly and used 2 Blossom Cutters one smaller than the other so it made a 3D effect and glued them together with a little bit of water, I veined the larger blossom by using a toothpick and brushed some edible glitter onto the smaller blossom, I then placed a small Sugar coated Chocolate bean in the middle for the Pistil (centre) and then carefully placed each Flower in a Egg Box Cup to form and dry in a Flower shape.

B-e-a-utiful!

The leaves were just made from the leftover Yellow Fondant with Blue Paste food colouring added, then rolled out and using a Plunger Cutter cut the Leaf out and then the end was wrapped around the end of a toothpick to made the shape.

And today I made these:
Free Style Orange Rose!
I made 3 Orange Roses, these will go on my Mums cake too hopefully (If I've got enough room) This was the first time I had made Roses Free Hand (No Cutters) I am very proud of myself for them and they are Gorgeous!